
This is your go-to spot for all things buying, storing, soaking, and cooking whole grains! There’s a handy grain cooking chart below for your regular reference.
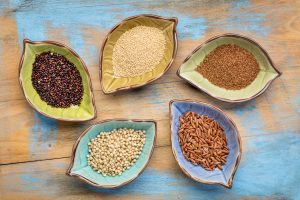
Whole grains are a fantastic source of complex carbohydrates. Their bran, germ and endosperm are fully intact which means all of their natural fiber, vitamins, minerals, and protein are present. The refining process strips out these beloved nutrients, so whole grains we go.
Also, whole grains are helpful in balancing our blood sugar because they metabolize more slowly and don’t send us on the blood sugar roller coaster ride that processed and refined grains do. Choose whole grains over refined and include them as part of a balanced, healthy diet (as tolerated).
GRAIN BASICS
BUYING
Preferably buy them in the bulk bins where there is higher turnover and less chance of them hanging out on the shelves in bags for, who knows how long. You can also only buy what you need to both manage your budget and ensure they are the freshest (which includes preserving taste and the grains’ vital nutrients). When buying corn or wheat-based grains, make sure they are organic or non-GMO.
STORING
Store grains in a sealed container, away from heat and light. They can be stored in the pantry for 6-8 months, in the refrigerator for 9 months, and freezer for about 12 months.
SOAKING
Soaking grains is a time-honored tradition. It cuts down on the cooking time and makes grains easier to digest. Not soaking is likely part of the reason some people don’t tolerate grains well. Reference the chart below for grain-soaking specifics.
Why soak grains? Grains have phytic acid, an anti-nutrient that binds up the minerals in the grain. Soaking degrades phytic acid and grants us access to those much desired nutrients. You can also ferment/sour or sprout grains, too. We’ll save that for another post though.
COOKING
- Rinse all grains before cooking to remove any dirt.
- Soak grains in a bowl with water for 6-8 hours. Not all grains require soaking. And some definitely do. See the chart below.
- Optionally: Toast grains for a 3-5 minutes in a dry skillet over low-medium heat, until they give off a nutty aroma. This makes them more digestible and offers a nice texture, an especially good technique with brown rice.
- Optionally: Add 1/4 to 1/2 teaspoon of sea salt per 1 cup grains when cooking.
- Bring grains, sea salt, and liquid to a boil, then reduce heat to a simmer and cover tightly.
- Don’t lift the lid to peek until you think it is done; doing this interferes with the steaming process.
- Don’t stir grains while cooking, no matter how tempting! Stirring destroys the network of steam vents that develop and grains end up having an under cooked or sticky texture. Instead, tip the pot to the side to see if there is still liquid. If yes, keep cooking.
- If water remains after the grain is tender, simply drain it off. If the grain is too hard or dry, add a little water and cook a few minutes more. If you want more of a porridge, enjoy the extra liquid.
- Remove the lid and allow grains to sit for 5 minutes. Gently fluffy with a fork. For firmer grains, keep covered and allow them to rest for 5 minutes after removing from heat.
- Stir in butter, ghee, coconut oil, olive oil, or sesame oil for healthy fat and flavor.
Can I blend grains?
Yes, as long as they have similar cooking times. Wild rice and brown rice work well. As do steel cut oats, millet, and quinoa (a yummy whole grain breakfast blend). You can also stir in barley, rye, spelt, or kamut flakes, which take about 30 min to cook and add a nice texture.
What liquids can I use?
This is the fun part that allows you to impart more flavor. Use bone broth, beef broth, coconut milk, almond milk. Good old water works fine, too. Just make sure you don’t do 100% broth for example. Cut it with at least half water. Using a thicker liquid will make it mushier if you’re not careful.
Can I add spices?
Why yes. You can cook with fresh minced garlic, cumin, cinnamon, or one of my favorites: a pinch of turmeric and black pepper for color and good measure.
Meal prepping for the week ahead
Make your life easier and cook a batch of grains ahead of your week. Have them on hand to add to soups, salads, serve with vegetables and stirfries. They’re tried and true breakfast staples as well. Re-heat them on the stove and add a sprinkle of water to steam and keep them moist. Be sure to rotate grains and eat in variety.
GRAIN COOKING CHART
Printable version here: Grain Cooking Chart
| Grain | Grain to Liquid Ratio (cups) | Preparation |
| Amaranth |
1:2 |
Simmer, covered for 25-30 minutes. (No pre-soak) |
| Barley, hulled* |
1:4 |
Simmer, covered for 60-90 minutes. (Must soak) |
| Barley, pearled* |
1:3 |
Simmer, covered for 15 minutes. If not soaked, simmer 40-60 min. |
| Buckwheat groats/kasha |
1:2 |
Simmer, covered for 10 minutes. Let stand 5-10 minutes. |
| Bulgar wheat* |
1:1 1/2 |
Pour boiling water over and soak 30-40 minutes, no cooking needed. |
| Farro/Emmer* |
1:2 |
Simmer, covered for 45-60 minutes. |
| Millet |
1:2 ¼ |
Simmer, covered for 20-25 minutes. (No pre soak) |
| Oat groats |
1:3 |
Simmer, covered for 50-60 minutes. (Must soak) |
| Polenta/yellow
corn grits |
1:4 1/2 |
Whisk into boiling liquid, stir constantly 5-10 minutes. Cover and let stand. (No pre soak) |
| Quinoa |
1:1 3/4 |
Simmer, covered for 15 minutes. Let stand 10 minutes. (No pre soak) |
| Rice |
1:2 |
Add to boiling water. Simmer, covered, 30-50 minutes. |
| Wild Rice |
1:3 |
Simmer, covered for 45-70 minutes. |
| Rye, whole* |
1:4 |
Simmer. Covered for 50-60 minutes, or 90 minutes if not soaked. |
| Spelt, whole* |
1:2 1/2 |
Simmer, covered for 50-60 minutes. (Must soak) |
| Steel Cut Oats |
1:3 |
Simmer, coverer 20 min, or 5 min if soaked. |
| Teff |
1:3 1/2 |
Simmer, covered for 15-20 minutes. (No pre soak) |
| Wheat berries* |
1:3 |
Simmer, covered 50-60 minutes. (Must soak) |
| FLAKES: Rye, spelt, barley, kamut* |
1:3 |
Add to boiling water, simmer, covered for 30 minutes. (No pre soak) |
Note that cooking time and liquids are approximate. Your stove and the age of the grain can cause variations in cooking time. Always check for doneness at least 5 minutes before the shortest cooking time listed. Allow more cooking time if needed.
GRAINS THAT CONTAIN GLUTEN*
If gluten intolerant, only choose oats that specifically say gluten free.